If you’re having trouble tracking the shell stones down, not to worry: we’re here to help. As a note, though you can track the stones down in any order with the exception of Shell Stone #1, we’ve organized them in the order they are found as you proceed up the mountain naturally, from bottom to top.
Paper Mario: The Origami King Shell Stones Guide
Shell Stone #1
The first shell stone is pretty hard to miss. As you travel up Overlook Mountain for the first time, you’ll be accosted by a mole who is attempting to sell a shell stone to the highest bidder.
You’ll probably have a decent hoard at this point, so the initial price of 10,000 coins might not seem all that bad, but don’t be afraid to haggle.
If you keep refusing the mole’s offer, you can purchase the shell stone for just 300 coins! Just make sure to accept the offer then, or else the surrounding Koopa Troopas will buy it and you’ll have to pay them 1,500 coins to get it back.
Shell Stone #2
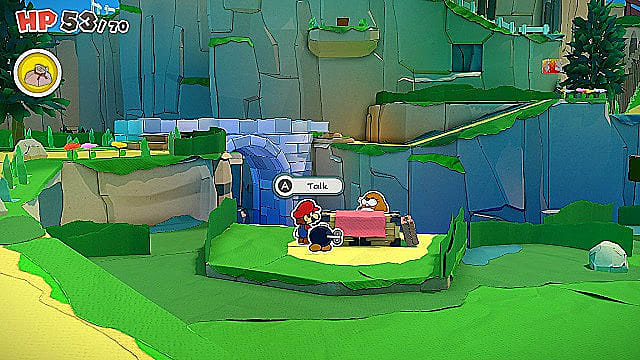
This shell stone is pretty easy to miss if you don’t know exactly where to look. As you approach the save block after crossing the bridge, you’ll see a suspicious section of cliff that looks like it’s about to peel off. To deal with it, you’ll need to check out the nearby papercraft hedges.
One of them will move slightly, and if you investigate it, you’ll be ambushed by a Folded Soldier Goomba. Defeat it, and a magic circle will appear near the face of the cliff, which will then allow you to peel off that suspicious section of the wall. Doing so will reveal a dehydrated Dry Bones and, more crucially, the second shell stone.
Shell Stone #3
Is a modern RPG really complete without a fishing minigame? Of course not, and Paper Mario: The Origami King is no exception.
After snagging the second shell stone, continue to the right, but not up the mountain. You’ll come to an area with white fencing and a path leading back into the background. Follow it, and you’ll find a peaceful pier with a fishing-loving Koopa ready to teach you the fine art of angling.
After the tutorial, take stock of the shadows you see in the water. One should look different from the rest of the Cheep Cheeps. Ensure that you’re ready for battle, and aim for that one.
You’ll land a Folded-Soldier-ified Cheep Cheep and it’ll attack you. Win the fight, and you’ll be rewarded with a shell stone. For extra credit, hang around and fish one more time, aiming for the fish that looks different from the rest in order to save a Toad!
Shell Stone #4
Soccer time! Proceed past Overlook Tower to the sports park, where you’ll encounter three Paper Macho Shy Guys playing keep-away with the final shell stone. You won’t be able to outrun them, so you’ll have to resort to cheating. Luckily, there are no red cards in Paper Mario: The Origami King.
Use your hammer to knock down one of the two Paper Macho Shy Guys that are not handling the shell stone, then approach the ball carrier from the other side. Since the Shy Guys will face away from you in order to protect the stone, the ball carrier will pass to the Shy Guy you just knocked down, allowing you to rush in steal the stone before they recover (assuming you’re fast enough). Afterwards, make sure to defeat them all to free a few Toads!
You’re all done! Now you can make your way over to the pipe by the tower and zip right to the Earth Vellumental Temple to continue your adventure.
Related Content
House of Riddles Solution How to Guess the Snifit Mood Can Opener Location
How have you been enjoying Paper Mario: The Origami King so far? Sound off in the comments, and make sure to bookmark the game page to keep up with all of our upcoming tips, tricks, features, and reviews!